My boyfriend and I were browsing a local craft store the other day and came across these parachute 550 cords. I’ve never really thought about it before, but did you know that these cords can hold 550 lbs? Okay it sounds obvious because I called it a parachute 550 cord, but if I just said parachute cord, I bet you wouldn’t have known. Anyway, it got him thinking that having cord like this on hand could come be useful if we’re ever out in the wilderness (as often as that happens) or maybe in the case of an emergency. So he asked if I could turn it into a bracelet that he could just wear around his wrist. That’s right, this bracelet is dual purpose, for fashion and also in case for some odd reason you need to carry up to 550 lbs of something via rope.
What you need:

- 17″ piece of parachute cord*
- 70″ piece of parachute cord*
- Parachute chord buckle
*Note: This is based off of a a 7″ diameter wrist. If you’re making this for a bigger or smaller wrist, you should adjust the cord length accordingly. Generally, I take double the diameter plus a 3-4 inches for the short cord, and four times the short cord plus a couple inches for cushion for the long cord.
Optional Materials:
- lighter (for frayed ends)
- scrap paper
Before we start, let me share a little trick I learned to get rid of frayed ends on the cords. Please be careful if you do this since it involves fire. Also, if you are below the age of 18, make sure you do this with parental supervision or just have your parents do it for you. That being said, start by trimming the frayed cord. Then using your lighter, burn the edge of your cord. We’re not trying to set it on fire, like we’re lighting a candle, we’re just trying to melt the cord down a little so the ends can fuse together. After you light the cord, use your scrap paper to push the outside of the cord in.


Okay, now that we don’t have to worry about our cord fraying, let’s get started.
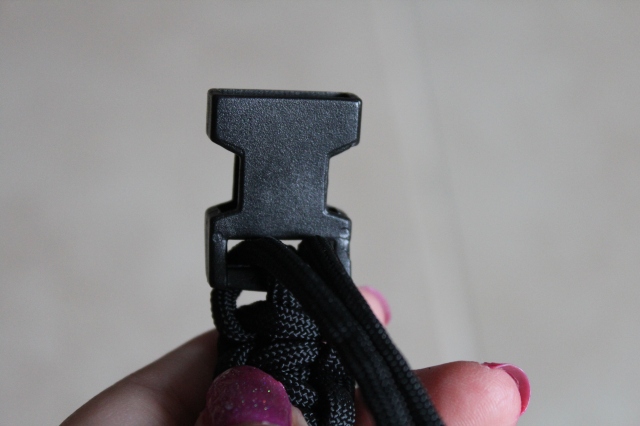
Step 1: Unbuckle the power cord buckle. Take the 17″ cord, string it through one side of the buckle, making sure that the cord is now evenly split in half. Then take the two ends and string it through the other side of the buckle, pulling about an inch through. You want the two ends to go in on the top side of the buckle and come out on the bottom side (this is to hide the loose ends on the underside of the bracelet).
Before we go on, make sure that the two ends of your buckle are facing the right way so that when you put the bracelet on they’ll click together. Now is also the time to test that this length will fit around the wrist. The length it’s at now will be the length it’s at when you’re done.


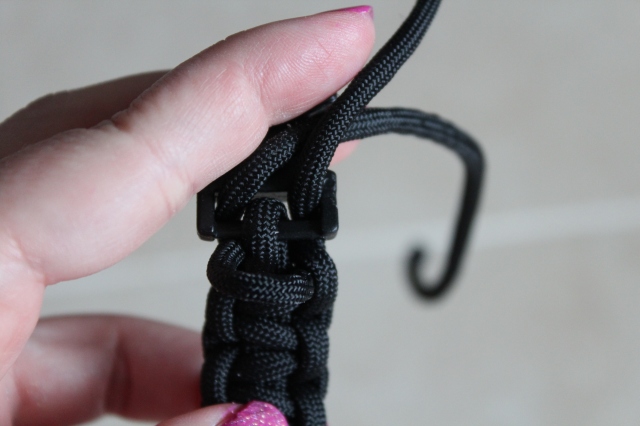
Step 2: Take your 70″ power cord and fold it in half. Take the middle point and put it around the side of your 17″ cord with the two loose ends. Make sure the top side of the bracelet is facing you. The side with the loose strings should be facing the ground.
Step 3: We’re now just going to make a simple knot (this process is similar to the bracelet made here). Take the string on the left from the 70″ cord and put it over the middle strings and under the other end of the 70″ cord on the right. Then bring the right cord under previously left cord, as well as the middle cords and through the loop we’ve created on the left, making a knot, and pull tight.

 Step 4: Push the first knot up to the buckle to make it as tight as possible. Now we’re going to make another knot, but in the opposite direction. Take the 70″ cord on the right and place it over the middle cords and under the 70″ cord on the left. Then bring the left cord under previously right cord, as well as the middle cords and through the loop we’ve created on the right, making a knot, and pull tight.

 Step 5: Repeat steps 3 & 4 until you hit the bottom where the other end of the buckle is. Make sure that your knots in the beginning go around the loose ends from the 17″ cord to secure them within the knots. Also, make sure you alternate between left and right knots or else your cord will start to twist.
 Step 6: Take your two loose ends and string them through the top side of the buckle and pull them out on the bottom (similar to Step 1 above).

 Step 7: On the underside of your bracelet, you want to loosen the horizontal part of the last two knots that you made. Note that if you prefer to just tie a knot and use some fabric glue, you could also do that, but I was challenged with finding a way to secure the bracelet, but still make it easy to undo it in case we need to use the rope.


Step 8: Now string your loose ends through the two loosened knots and then pull so that the knots are tight again.

Step 9: Cut off the excess cord on your two loose ends, but don’t cut it all the way to the knot it’s under. I recommend leaving a little extra rope just in case. Once you do this, you’re done.


 Step 4: Repeat step 3 on all sides of your container, and you’re done! Yes, it really was that easy.